My CPU load is constantly at 100%

I would like to thank you for the support you give.

first, I am not using wordpress at all.

But I am installing ERPNext on a VPS (OVH).

second, still I am under testing ERPNext, so this instance installed for me only no one is using it.

Now it seems everything is back to normal, CPU load is 1 to 2%. I am not able to find the root cause instead?

Do you recommend for Live production to be 2 separate dedicated servers one for application and second for database?

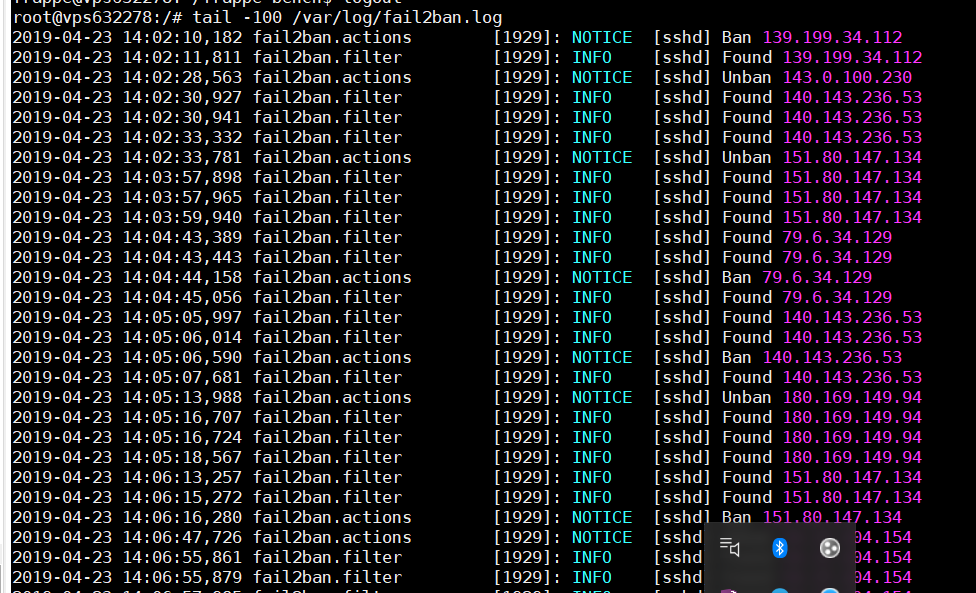
The fail2ban logs are here (I show tail in the command, but you can also use cat
This will show 100 lines…

tail -100 /var/log/fail2ban.log

output, no idea what does it say below output?

There are a few attempts on the server, but nothing that should spike your CPU that high for that long. I would look at a possible missing python3 library, but those should have been installed in the setup process anyway.
Short of you having an imminently failing piece of hardware like a disk drive, I’m afraid I don’t have any further suggestions - maybe one of the other guys here can assist you.

1 Like

This is the setup that I used on production env, separate app and database. It’s definitely faster than single instance. Easier to debug bottlenecks too if there are any.

1 Like

If you’re getting unexplained commands in crontab and high CPU usage, my first instinct would be to say that your server has been compromised. Misspelled processes names like “firefoxcatche” often belong to mining trojans.

1 Like

fail2ban problem from user privileges and logs files
temporarily stop it using

sudo service fail2ban stop

until you find solution and Migrate from the AWS

but I am using a VPS from OVH, not AWS.

any help what you can read in above screen shot

Hi.

OVH are pretty good so you should have this.

If you are using Debian on OVH, you can try the following:

  1. Edit SSH to disable root login and password authentication (assuming your using SSH certificates which OVH usually set for the first login)

sudo nano /etc/ssh/sshd_config

Scroll down and find PermitRootLogin to no and PasswordAuthentication to no. Remove any # at the beginning of the line.

EDIT:: Reboot the server rather then restarting

sudo shutdown -r now

Try that and see what happens.

EDIT:: You could go further and restrict SSH to specific IPs. Very easy to do but if your IP changes you will need to go in via OVH control panel under root to edit the IP address to let you back in…

Thanks.

1 Like

Hi,
Thanks for the update.

I am using ubuntu 16.04 with OVH.

Sorry but how I can check that I am using SSH certificates from OVH I am not sure about this point.

I am using Mobaxterm to connect to server using root user.

if I perform edit you just mentioned @abbas do my connection will be impacted? note I am able to nano this file.

Thx

To check your cert any of these may help

https://check-your-website.server-daten.de
https://www.ssllabs.com

https://transparencyreport.google.com/https/certificates

In the above tab look for ‘Search certificates by hostname’ and enter a domain, to get for example this query result below:

https://transparencyreport.google.com/https/certificates?cert_search_auth=&cert_search_cert=&cert_search=include_expired:false;include_subdomains:true;domain:google.com&lu=cert_search

On OVH, authentication is based on SSH keys and not usernames and password:

The following two links should jog your memory:

Create SSH Keys

Additional Keys

Once added, you would have SSH’d into your server IP using the username Ubuntu. This username will have admin rights so you do not need to use root.

Assuming the above makes sense, you should login as Ubuntu with your SSH certificate edit the /etc/ssh/sshd_config to disable rootlogin and password authentication. This will not affect your current session.

Let me know how you get on…

1 Like

Hi abbas,
I lost connection to server through mobaxterm?

I have created ssh key and added to OVH profile?

Session stopped
- Press to exit tab
- Press R to restart session
- Press S to save terminal output to file

Disconnected: No supported authentication methods available (server sent: publickey)

I use webssh as it’s much easier. OVH keys only update on new server deployment.

Looks like you managed to disable that somehow.

Login to OVH control panel and go to you server.

Click the little arrows and choose VNC client. Login with your root user id and password.

Can you login?

yes I did,and I have enabled again root…

Great.

1st thing check what users you have setup by:

cd /home

Then

ls

Each directory will be a user, if you don’t recognize any you can delete the user with the following command:

sudo deluser username

Then remove their directory

sudo deluser --remove-home username

Now check if you have a swap as one will not be created by OVH by default.

free

If you only see one line which is MEM then you need to create a swap.

Assuming you only want 1GB swap (1000mb), enter the following:

sudo touch /var/swap.img
sudo chmod 600 /var/swap.img
sudo dd if=/dev/zero of=/var/swap.img bs=1024k count=1000
sudo mkswap /var/swap.img
sudo swapon /var/swap.img

Check enabled by:

free

You should see two lines, one Mem and one Swap

Now add to fstab so swap is loaded on reboot:

sudo nano /etc/fstab

Add the following at the end of the file:

/var/swap.img none swap sw 0 0

Next create a new user for SSH:

sudo adduser NewUsername

and populate the prompts with name password etc…

Give sudo permission for new user “NewUsername”

sudo usermod -aG sudo bench

Setup SSH by logging in as new user:

su - sudo NewUsername

mkdir .ssh
chmod 700 .ssh
nano .ssh/authorized_keys

In the authorized_keys file paste in a new Public key you create by following this.

You just need to follow the windows portion to create your keys.

Once you have saved the authorized_keys, you should now be able to SSH to NewUsername with you SSH keys. Try this now to make sure it is working before following the final step.

Next, we need to lock down SSH so it only users with a key can as per the above:

[quote=“abbas, post:32, topic:48101”]

sudo nano /etc/ssh/sshd_config

Scroll down and find PermitRootLogin to no and PasswordAuthentication to no. Remove any # at the beginning of the line.
[/quote].

If you want to further lock down SSH, I would restrict the IPs by:

sudo nano /etc/hosts.deny

Add:

sshd : ALL EXCEPT /etc/ssh.whitelist

Then:

sudo nano /etc/ssh.whitelist

Add the IP address which is the only one which allows SSH. Only do this if you have a fixed IP.

Don’t forget to reboot the server:

sudo shutdown -r now

Does that help?
Done, see below is it correct? do my ubuntu user created correctly, note I did not give any PW?

[naouf.LAPTOP-5F23F7J8] ➤ ssh ubuntu@51.77.200.11
Welcome to Ubuntu 16.04.6 LTS (GNU/Linux 4.4.0-145-generic x86_64)

Get cloud support with Ubuntu Advantage Cloud Guest:
http://www.ubuntu.com/business/services/cloud

46 packages can be updated.
0 updates are security updates.

New release ‘18.04.2 LTS’ available.
Run ‘do-release-upgrade’ to upgrade to it.

Last login: Sat Apr 27 12:43:32 2019 from 197.2.113.173
ubuntu@vps632278:~$

Perfect that means you have logged in.

I wouldn’t set a password for as you should create a new user to do all of your work including installing bench/ERPNext. However you can set one by simply

passwd

Once you have modified the ssh config above, you should only be asked for the password when you use the sudo command.

Thanks.