ERPNext print format customization guide

This is guide is taken from GitHub - rtdany10/erpnext_print_format: ERPNext Print Format guide.

Thought it would be helpful for people on the forum.

Creating beautiful print formats in ERPNext.

ERPNext is a beautiful software and many organizations use it. And print formats are really important to organizations as hardcopy of every document with their letterhead is a core requirement. Recreating their template in ERPNext is an art and not easy.

I’ll break down the process to make it easy for all the beginners.

ERPNext uses Jinja templating for this purpose. I’m not going to give you a deep explanatory course on Jinja, but the basics that you’ll need for a neat, aesthetic template.

When the client gives you their existing template, you should make a thorough observation of it.

First off, we split the template into 3 parts: Above, Middle and Below.

  1. Above: The above part includes all the static items in the page including the letter head, the customer details and the head of the table(if any).
  2. Middle: This part consists of recurring things in the template. Eg: the rows in the table.
  3. Bottom: This part consists of static items in the bottom half of the template, including the footer of the table, other calculations and footer of the template.

Now that we have divided the template into three parts. It becomes fairly easier for us to do things and also makes the code look beautiful(you’ll understand how as you keep reading). We will now use macros for the above and bottom sections/parts. Macros are pieces of code defined by a name. And hence, you can call them just by that name whenever you need them(like functions).

Define a macro:

{% macro name_of_macro() %}
	<p>Hi</p>
{% endmacro %}

Now, you can refer to that macro anywhere(below its declaration) with: {{ name_of_macro() }}

Each time you call it, the code inside of it replaces it.

	<p>Test</p>			>		<p>Test</p> 
	{{ name_of_macro() }}		>		<p>Hi</p>
	<p>Again test</p>		>		<p>Again test</p>
	{{ name_of_macro() }}		>		<p>Hi</p>
	<p>Finish</p>			>		<p>Finish</p>

Recreate the the whole template in html with the help of bootstrap.

Here is a basic example of HTML code with bootstrap:

<div class="container-fluid">
	<div class="row d-flex align-items-end justify-content-between" style="padding-top: 10px; font-size: 13px">
        	<div class="col-xs-12">
            		Dear Sir/Madam,<br>
            		Thank you for placing the purchase order. We hearby confirm our acceptance as follows:
        	</div>
    	</div>
</div>

Using col-xs is necessary as anything else will cause wkhtmltopdf to break and the the generated PDF will loose its alignment, although the print version will look fine. Intendation is also very important as if increases the readablity of the code and when working as a team, it gives a great advantage.

Now that you have converted the basic template into html format, its time for us to use Jinja to fetch value into our format. The format for it is {{ name of variable to print }}

In ERPNext, these variables are inside each doctypes. And to access them, we use doc.name_of_field. To get the fieldname of a column, we can go to customise form and select the doctype we want to and search for the field and get its fieldname. Example code to fetch document name: {{ doc.name }}

Split to macros

Now that we know how to fetch values and that we have the template in HTML, we can actually split the template into macros.

Above Section

{% macro above_items() %}
<div class="container-fluid" style="min-width: 100% !important; min-height: 210mm !important;">
    <div class="row d-flex align-items-end justify-content-end">
        <div class="col-xs-4 text-left" style="margin-top: -15px">
            <img alt="Logo" width=100% src="/files/nameoflogo.png">
        </div>
        <div class="col-xs-8 text-right">
            <b>SALES ORDER</b>
        </div>
    </div>
    
    <div class="row d-flex align-items-end justify-content-between" style="padding-top: 10px; font-size: 13px">
        <div class="col-xs-6">
            <b>{{ doc.customer_name }}</b><br>
            {{ doc.shipping_address }}
        </div>
        <div class="col-xs-6 text-right">
            <span style="font-size: 13px">
                <b>{{ doc.name }}</b><br>
            </span>
            {{ doc.transaction_date }}<br>
            <b>Your PO Reference</b><br>
            {{ doc.po_no }}
        </div>
    </div>
    
    <div class="row" style="padding-top: 10px; font-size: 13px">
        <div class="col-xs-12">
            Dear Sir/Madam,<br>
            Thank you for placing the purchase order. We hearby confirm our acceptance as follows:
        </div>
    </div>
	<table class="table table-bordered text-wrap" style="overflow-x: hidden; table-layout: fixed !important">
        <thead>
            <tr class="table-info" style="font-weight: bold;">
                <td style="width:6%;">Sr</td>
                <td>Product</td>
                <td style="width:6%;">Unit</td>
                <td style="width:10%;">Qty</td>
                <td style="width:22%;">Order</td>
            </tr> 
        </thead>
        <tbody>
{% endmacro %}

Notice how the table is started in the above part, but not closed. It’s because we assign the body of the table to the middle part/section and the footer to the below.

Below Section

Once we create the above section, it is time for us to create the below section. We will move on to the middle section after the below part.

{% macro below_items() %}
        </tbody>
        <tfoot style="font-weight: bold;">
            <tr class="table-info">
                <td colspan='3' style="text-align: right">Total Quantity</td>
                <td>{{ "%.2f"|format(doc.total_qty|float) }}</td>
                <td></td>
            </tr>
        </tfoot>
    </table>
</div>
<!-- Our first container was closed here. It has height of 210mm -->

<div class="container-fluid" style="min-width: 100% !important;">
    <div class="row d-flex align-items-end justify-content-between" style="font-size: 13px;">
        <div class="col-xs-6">
            Store Incharge:<br><br>
            Authorised Signatory:
        </div>
        <div class="col-xs-6">
            Signature:<br><br>
            Signature:
        </div>
    </div>
</div>
{% endmacro %}

Now, if we check the below part, we can see how the table we opened in the above section was beautifully closed. See how the intendation makes it easier to read the code! Now, if we just print the above and below sections, we will be able to see the template(without any rows in the table ofc!)

Middle Section

Now comes the best part! The middle section, where all the fun is! Here, we don’t define it as a seperate macro, rather, we just write it down(You’re always free to write it as a macro and call as well!)

{{ above_items() }}
{% set pr = [1] %}
{% set lines = [0] %}
    {%- for row in doc.items -%}
        {% if lines[-1] %} {% endif %} 
        {% if lines.append( lines[-1] + 2 +((row.description|length / 38)|int)) %}{% endif %}
        {% if (row.description|length % 38) > 0 %}
            {% if lines[-1] %} {% endif %} 
            {% if lines.append( lines[-1] + 1 ) %}{% endif %}
        {% endif %}
        {% if (lines[-1]/30) <= pr[-1] %}
            <tr class="table-info">
                <td>{{ row.idx }}</td>
                <td>{{ row.item_name }}<br>{{ row.serial_no }}</td>
                <td>{{ row.uom }}</td>
                <td>{{ row.qty }}</td>
                <td>{{ row.purchase_order }}</td>
            </tr>
        {% else %}
            {{ below_items() }}
            <div style="page-break-before: always;"></div>
            {% if pr[-1] %} {% endif %} 
            {% if pr.append( pr[-1] + 1 ) %}{% endif %}
            {{ above_items() }}
            <tr class="table-info">
                <td>{{ row.idx }}</td>
                <td>{{ row.item_name }}<br>{{ row.serial_no }}</td>
                <td>{{ row.uom }}</td>
                <td>{{ row.qty }}</td>
                <td>{{ row.against_sales_order }}</td>
            </tr>
        {% endif %}
    {%- endfor -%}
{{ below_items() }}

This middle section first calls the above_items(). This places all the above items in our print. Then we define two lists in Jinja. One for the number of lines our table has, and another for number of pages required.

I calculated the width length of my product description column and understood that it can hold upto 38 characters without breaking into a new line.

Then we run a loop through the table and add 2(which is a fixed number because rows themselves takes up some space) plus length of the description divided by 38(after converting it to int). Then we check if there is float(decimal) value upon that division, and if any, we add 1 to it. And thus, we get the number of lines required by the rows in that table.

Now, I did my experiments and found out that I can have no more than 30 lines in 1 page. So we have to break the page after every 30 lines. So we do a simple check before printing the row to the page if it will exceed the maximum number of lines allowed. We do that by dividing it by 30 and checking if it is less or equal to the number of pages required till now.

If it is less or equal, we print the row. And if not, we call for the below items which will put the footer and other items specified in it. And then, we break the page. Once we break the page, we increase the number of pages required and call for the above items since we moved on to new page and print the current row there.

This loop continues until the last row after which a below_items() will be called which will end the last page.

Make sure to follow the format and place middle section at the bottom of the code!

And there you have, beautifully printed dynamic invoices and receipts!

30 Likes

@Nikunj_Patel, Thank you for such a helpful information.

Thanks for the wonderful content.

May you please tell me what to write for GST and PAN? like doc.name and doc.transaction_date to fetch name and date?

Thankyou

Please tell me more about signature field which can be added in print format how it will work when we create quotation.

Thankyou

hope this will help !

Customize Address List Doctype then add one field

This is custom print format

<div class="col-md-9">CIN No :{{frappe.db.get_value("Address", {"is_your_company_address": "1"}, "cin_no") }}</div>
1 Like

@Nikunj_Patel is it possible if you could attach here the print layout in PDF file that the above code will produce? I am having a hard time customizing a custom print layout right now. We cannot reduce the spacing per item line or per next row. :frowning:

image

@ponyooooo

To adjust the rows height read below : (You need to do some calculations and adjust some numbers in the code)

This middle section first calls the above_items(). This places all the above items in our print. Then we define two lists in Jinja. One for the number of lines our table has, and another for number of pages required.

I calculated the width length of my product description column and understood that it can hold upto 38 characters without breaking into a new line.

Then we run a loop through the table and add 2(which is a fixed number because rows themselves takes up some space) plus length of the description divided by 38(after converting it to int). Then we check if there is float(decimal) value upon that division, and if any, we add 1 to it. And thus, we get the number of lines required by the rows in that table.

Now, I did my experiments and found out that I can have no more than 30 lines in 1 page. So we have to break the page after every 30 lines. So we do a simple check before printing the row to the page if it will exceed the maximum number of lines allowed. We do that by dividing it by 30 and checking if it is less or equal to the number of pages required till now.

If it is less or equal, we print the row. And if not, we call for the below items which will put the footer and other items specified in it. And then, we break the page. Once we break the page, we increase the number of pages required and call for the above items since we moved on to new page and print the current row there.

This loop continues until the last row after which a below_items() will be called which will end the last page.

Make sure to follow the format and place middle section at the bottom of the code!

And there you have, beautifully printed dynamic invoices and receipts!

Happy coding and printing!

Hi. Are the macros written in the same html editor as the print-format or are they written in some external file and then called from the editor? If so, where and how would it be done? Thanks

@Nikunj_Patel @Suresh_Thakor thanks for the detail explanation…but can you explain how we can add The “created By” “Edited By” or other fields on the custom print format.thanks

Thanks @Nikunj_Patel

I’m curious if this is still valid for ERPNext v14.

I tried to create a custom print format and used your code in the HTML window.

If I put the code in your preferred order I get the following errors:
for line - {% if (lines[-1]/30) <= pr[-1] %}
error = Expected tag name. Got something else instead.

For the table data items in the middle section all <td> and </td> tags error as ignored.
If I move the middle section in between upper and lower, then the tag errors go away, but still have the above error line - {% if (lines[-1]/30) <= pr[-1] %}.

Does this need to be done in “developer mode” by editing files in the backend?

@volkswagner
Were you able to solve this issue? I am confronted by the same one.

I was not able to get a fully HTML print template. I used a combination of HTML fields and standard fields within v14 custom print format.

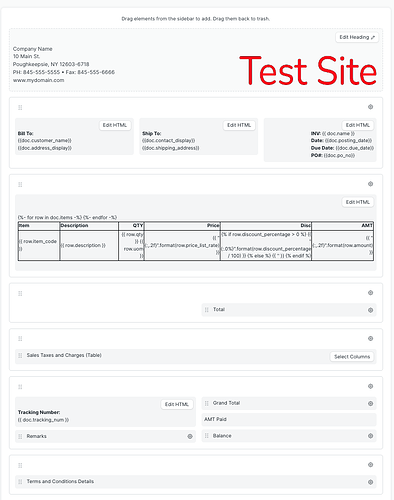
For example, I used the following to take control of the items table in Sales Invoice. My primary reason was to get rid of the index number. It has the added benefit of added control, but also at a cost of some complexity. The complexity comes when trying to round numbers or add commas to numbers.

<br>
<table style="width:100%;">
<thead>
    <tr style="border: 1px solid black; border-collapse: collapse;">
        <th style="border: 1px solid black; width: 20%; text-align: left;">Item</th>
        <th style="border: 1px solid black; width: 41%; text-align: left;">Description</th>
        <th style="border: 1px solid black; width: 12%; text-align: right;">QTY</th>
        <th style="border: 1px solid black; width: 10%; text-align: right;">Price</th>
        <th style="border: 1px solid black; width: 5%; text-align: right;">Disc</th>
        <th style="border: 1px solid black; width: 12%; text-align: right;">AMT</th>
    </tr>    
</thead>
{%- for row in doc.items -%}
<tr style="border: 1px solid black; border-collapse: collapse;">

    <td style="border: 1px solid black; text-align: left;">
        {{ row.item_code }}</td>
    <td style="border: 1px solid black; text-align: left;">
        {{ row.description }}</td>
    <td style="border: 1px solid black; text-align: right;">{{ row.qty }} {{ row.uom }}</td>
    <td style="border: 1px solid black; text-align: right;">{{
                "{:,.2f}".format(row.price_list_rate) }}</td>
     <td style="border: 1px solid black; text-align: right;"> {% if row.discount_percentage > 0 %} {{ "{:.0%}".format(row.discount_percentage / 100) }} {% else %} {{ '' }} {% endif %}</td>            
    <td style="border: 1px solid black; text-align: right;">{{
                "{:,.2f}".format(row.amount) }}</td>
    </tr>
    
    {%- endfor -%}
    </table>
    <br>

Please post your specific issue. I believe the code does work. I should’ve tried before my reply. When you try the code you must create a new print format and select the “is custom” check box. This will give you an html window and a css window.

I’m not sure if it’s working fully because it prints the table footer on each page, which seems odd to me. It will have the signature lines on every page.

I think using the standard print format builder with custom HTML fields gives the best of both worlds. It will pageinate the items table but only put the header on the first page and the footer on the last page. This is my preferred look but perhaps others want the header on every page (which would be fine with me but I think having the footer on every page is strange).

What would be nice is the header on every page, the footer only on the last page with grand totals, and the middle pages with subtotals for only the items on that page.

1 Like

Here’s what my Sales Invoice template looks like:

I have some custom fields in Sales Invoice for determining the amount paid.
AMT Paid is a custom HTML field with the following in options.

<strong>Payments:</strong>
<span style="float: right;">{% set total_paid_amount = [] %}

   {% set total_paid_amount = doc.base_rounded_total - doc.outstanding_amount %}
    {{ "$%.2f"|format(total_paid_amount) }}
</span>

In the invoice template, I changed the label for “outstanding_amount” to “Balance”.

1 Like

Thank you for your response.

My Usecase is, that I want to create a PrintFormat for an Invoice. All Invoices are going to be single page. But we have 2 Customers where the invoice would have a second page. I wanted to print the invoice details like Invoice Number, Cost Center, Customer Number also on the second site. And this is nearly impossible with the standard HTML Printformat. But I testet it with custom HTML in the Builder and I think it works quite well.

Also thanks for your template!

You’re welcome.

We also have situations where we want to force invoices with many lines on one page. I created a additional print format calle “finePrint” and set the custom css like below, where normally we use font size 12px.

.print-format {
	font-family: 'Tahoma';
	font-size: 10px;
    margin:1mm;
}

This lets us get up to 20 items on one page including headers and footers.

Have you tried the Print Designer?

Iam experimenting right now with the Print Designer. The letterhead is repeated automaticly on every page. But can I also set a specific element outside of header and footer to repeat on every page?

No, not right now.

1 Like

Thank you