Overriding Frappe UI: A Step-by-Step Guide with Explanations
This guide focuses on overriding the Frappe CRM app, inspired by Safwan Erooth’s tutorial https://www.youtube.com/watch?v=OKrGJa2NnIs. It explains how and why to extend or modify Frappe’s CRM module UI for your custom requirements.
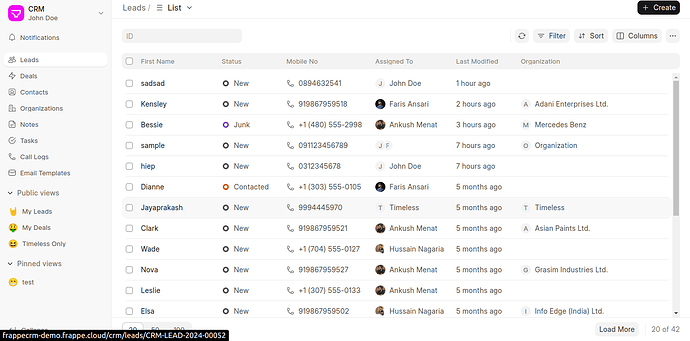
We’ve also included a reference to the Frappe CRM GitHub repository and a screenshot of the CRM app UI for better context.
Prerequisites
Ensure you have the following:
- Frappe Bench Installed: To manage Frappe apps and sites.
- Basic Knowledge of Vue.js: Many Frappe UI components use Vue.js.
- Familiarity with Frappe’s Folder Structure: Helps locate and organize files effectively.
GitHub Repository
The Frappe CRM app source code is available on GitHub:
![]() Frappe CRM GitHub Repository
Frappe CRM GitHub Repository
Steps to Override Frappe UI
1. Setup Your Environment
Directory: Navigate to your Frappe Bench directory.
bench get-app crm
bench new-site sitename
bench install-app crm
These commands:
- Download the core CRM app to work with.
- Create a new Frappe site (sitename) where the app will be installed.
- Install the CRM app to this new site. This ensures your changes will work in a controlled environment without affecting other sites.
2. Create a Custom App for Overrides
Directory: Still in your Frappe Bench directory.
bench create-app crm-overrides
bench install-app crm-overrides
Creating a custom app (crm-overrides) helps separate your customizations from the core CRM app. This ensures:
- Your changes don’t interfere with the original CRM app.
- Easy maintenance and compatibility during Frappe or CRM upgrades.
3. Copy Required Files
Directory: From the root of your Frappe Bench directory.
cp -rf apps/crm/frontend apps/crm-overrides/
cp -rf apps/crm/package.json apps/crm-overrides/
cp -rf apps/crm/frappe-ui/ apps/crm-overrides/
You need to copy the necessary files from the CRM app to your custom app to:
- Retain the original structure and dependencies.
- Set up a foundation for making modifications without disrupting the original app.
4. Prepare the Override Folder
Directory: Navigate to the crm-overrides app directory.
mkdir -p src_override/components/Layouts
The src_override folder mirrors the structure of the original app but only contains files you wish to modify. This ensures:
- Overridden files are organized systematically.
- Unchanged files remain untouched, minimizing unnecessary duplication.
5. Add the Video Component
Directory: Still in the crm-overrides app directory.
Create a new file for your custom Video Component:
Add the following content to Video.vue:
<template>
  <div class="video-page">
    <h1>Welcome to the Video Page</h1>
    <iframe
      width="560"
      height="315"
      src="https://www.youtube.com/embed/dQw4w9WgXcQ"
      title="YouTube video"
      frameborder="0"
      allow="accelerometer; autoplay; clipboard-write; encrypted-media; gyroscope; picture-in-picture"
      allowfullscreen
    ></iframe>
  </div>
</template>

<script setup>

</script>

<style scoped>
.video-page {
  text-align: center;
  margin-top: 20px;
}
</style>
6. Override a Component
Directory: Still in the crm-overrides app directory.
Copy the component you wish to override:
cp src/components/Layouts/AppSidebar.vue src_override/components/Layouts/
Copying the file (AppSidebar.vue) allows you to customize it without altering the original. Modifying the sidebar, for instance, can add links or change styles, making it align with your requirements.
Example Customization Add a new link to the sidebar:
{
label: 'Video',
icon: Email2Icon,
to: 'Video',
},
This provides a practical use case for overriding—a customized navigation experience for users.
7 Customize Routing
Directory: Still in the crm-overrides app directory.
Copy the router.js file:
cp src/router.js src_override/
The router.js file defines routes for navigating between components in the app. Copying and modifying this file allows you to:
- Add new routes.
- Redirect users to custom components.
Example Add a new route:
{
alias: '/video',
path: '/Video',
name: 'Video',
component: () => import('@/pages/Video.vue'),
meta: { scrollPos: { top: 0, left: 0 } },
}
8. Create a Custom Build Script
Directory: Still in the crm-overrides app directory.
Custom Script (custom-build.js):
const fs = require('fs-extra');
const path = require('path');
const { execSync } = require('child_process');

const crmAppPath = path.resolve(__dirname, '../../crm/frontend');
const overrideSrcPath = path.resolve(__dirname, 'src');
const overrideFilesPath = path.resolve(__dirname, './src_override');

console.log('Starting: Copying original src.');
fs.copySync(path.join(crmAppPath, 'src'), overrideSrcPath);
console.log('Completed: Copying original src.');

console.log('Starting: Overriding src.');
fs.copySync(overrideFilesPath, overrideSrcPath);
console.log('Completed: Overriding src.');

execSync('yarn install', { stdio: 'inherit' });
This script:
- Copies the original src folder from the CRM app.
- Applies the overridden files from src_override.
- Ensures dependencies are installed (yarn install).
This automates the process of merging your overrides with the original app.
Update vite.config.js:
Directory: Still in the crm-overrides app directory.
outDir: '../crm_custom/public/frontend',
Specifying the outDir ensures that the build outputs go to the correct directory (crm_custom), which Frappe serves as assets.
Update package.json:
Directory: Still in the crm-overrides app directory.
"scripts": {
"prebuild": "node ./custom-build.js",
"dev": "vite",
"build": "yarn prebuild && vite build --base=/assets/crm_custom/frontend/ && yarn copy-html-entry",
"copy-html-entry": "cp ../crm_custom/public/frontend/index.html ../crm_custom/www/crm.html",
"serve": "vite preview"
}
Custom scripts streamline development (dev), building (build), and previewing (serve) the app. It ensures the build process integrates with the customizations.
Install Dependencies and Build
Once your setup is complete, run the following commands from the crm-overrides app directory:
yarn
yarn build
These commands:
- Install all necessary packages.
- Build the app, incorporating the overrides and preparing it for deployment.
Conclusion
This approach allows you to customize the Frappe UI while keeping your changes modular and maintainable. Each step is designed to ensure your customizations are clean, isolated, and resilient to future updates.
Got questions or ideas? Let us know in the comments!
