Hi,
I am using ERPNext Cloud version 12.11.2. Now we have requirement to restore our data locally.
Here are the steps I took.
I have downloaded the backup on this path from ERPNext Cloud
“C:\Users\jhuss\Downloads\20200907_072100-steps_erpnext_com-database.sql.gz”
I have installed Virutal box and have imported ERPNext-Production.ova in the machine
I have upgraded the bench before setting my local website http://localhost:8080/ and site is configured.
I ran this command.
bench --site [sitename] --force restore [path to database backup file]
I am getting below invalid path error. How to type this path?
C:\Users\jhuss\Downloads\20200907_072100-steps_erpnext_com-database.sql.gz
Will this backup also copy all documents attached to the sales and purchase invoices?
Will get back here for further questions.
1 Like
Unzip it first as shown below command.
root@vmi417656:~# gunzip /etc/suresh/20200903_213042-mysite.com-database.sql.gz
root@vmi417656:~# su frappe
frappe@vmi417656:/root$ cd
frappe@vmi417656:~$ cd frappe-bench
frappe@vmi417656:~/frappe-bench$ bench --site mysite.com --force restore /home/suresh/20200903_213042-mysite.com-database.sql
MySQL root password:
Creating Database…
13.5MiB 0:00:41 [ 334KiB/s] [======================================================================================================================>] 100%
*** Scheduler is disabled ***
Site mysite.com has been restored
Hi Suresh
Do I have to write comand like this
gunzip C:\Users\jhuss\Downloads\20200907_072100-steps_erpnext_com-database.sql.gz
If I need to copy this file to virtual machine then how I copy it and unzip?
Connect putty to your VM. If it will succeed then you can transfer file using command or use
WinSCP utility in windows PC.
Transfer file any specific location /xyz/backup.sql.gz
Run command from terminal
gunzip /xyz/backup.sql.gz
Then
frappe-bench$ bench --site test.example.com --force restore /xyz/backup.sql
That’s it. Enjoy ERPNEXT.
Hi Suresh,
I installed putty but I get error “Network error: connection refused”
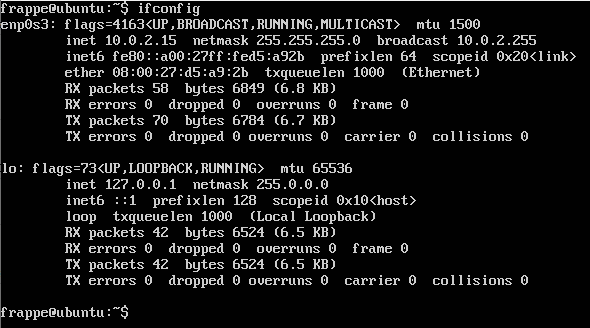
ifconfig shows two ip addresses
10.0.2.15
127.0.0.1
in putty i tried both ip addresses with port 22. I tried also localhost with port 22 and it did not work also.
I have two adapters set in VM
Adapter-1
attached to: NAT
Adapter-2
Bridged Adapter
Intel ethernet Connection.
Advanced setting - Promiscuous Model "Allow All
Cable connected checked
Which settings are wrong here?
I also changed
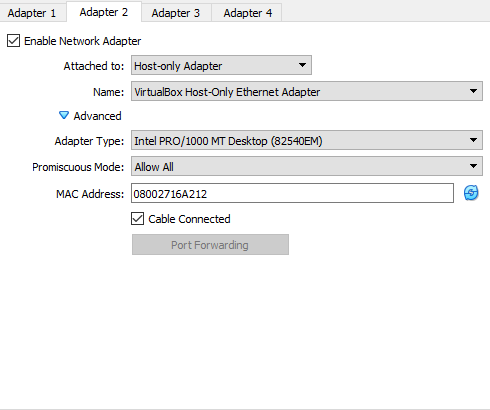
adapter-2
attached to Host-only adapter
Virutalbox host-only ethernet Adapter
Advanced setting - Promiscuous Model "Allow All
Cable connected checked
sudo service ssh status
shows that ssh is active and running.
I have tried this.
For Ubuntu 18.04 and VirtualBox 5.2:
-
Create a Host Network Interface i. On Virtualbox, click
File / Host Network Manager .ii. If you don’t already have a Host Network adapter (default vboxnet0 ), click Create .
-
Enable Host-only Adapter settings for VM i. On Virtualbox, right click on your VM and select
Settings .ii. Click Network and select Adapter 2 .iii. Click Enable Network Adapter .iv. Under Attached to: select Host-only Adapter . The name of the adapter you created in step 1 should appear (default vboxnet0 ).
-
Configure network settings in VM i. Start your VM and check which interface was added:
ip a . Look for the interface that doesn’t have an inet address. On mine, it was enp0s8 .ii. Edit /etc/netplan/01-netcfg.yaml . e.g. sudo vi /etc/netplan/01-netcfg.yaml .iii. Under the settings for the original adapter, add configuration details:
enp0s8:
    addresses: [192.168.56.2/24]
    gateway4: 192.168.56.1
    dhcp4: no
This assigns a static ip address for your VM for SSH convenience. If you want dhcp to handle the addressing instead, leave out the address and gateway config and set dhcp4 to yes .iv. Reload the configuration file: sudo netplan apply .
4. SSH into your VM i. If you have not installed ssh in the VM: sudo apt install ssh .ii. From your host machine, SSH into the VM: ssh <username>@192.168.56.2 .
Hi Suresh,
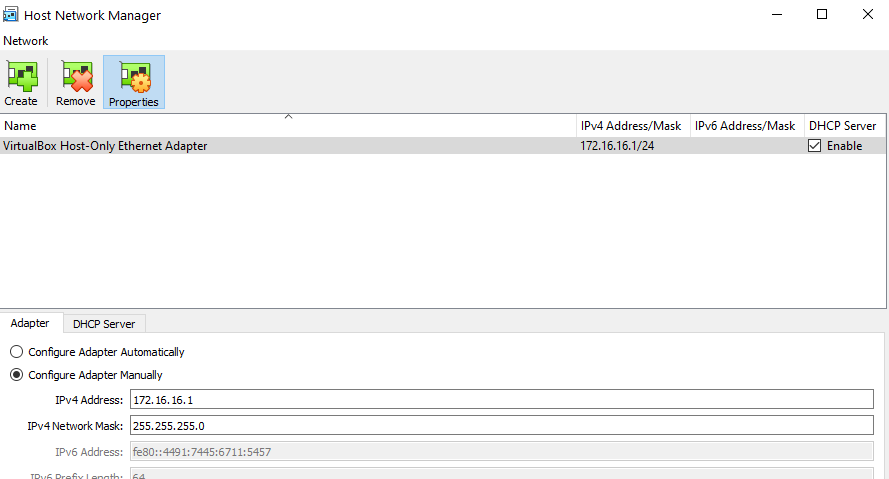
Create a Host Network interface:
I have below host already created.
Enable Host-only Adapter settings for VM
Adapter2 settings are here.

Configure network settings in VM
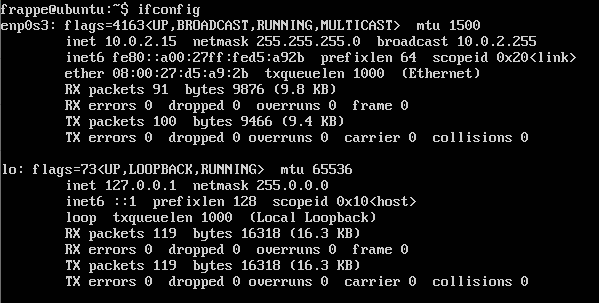
ifconfig shows me below information and it does not show any ip address e.g 172.16.16.2

sudo vi /etc/netplan/01-netcfg.yaml
it is modified like this and “sudo netplan apply” applied

Machine powered off and restarted.
Still same ip addresses.

Your Guest will have the following IP addresses, assuming that you have enabled the DHCP for the Host-Only network and it starts with .100:
eth0:
Address: 10.0.2.15
eth1:
Address: 192.168.56.100


