Just thought I’d share this incase it helps anyone else.
This code will allow you to print directly to a networked Zebra label printer from any device connected to your network, without adding any additional software or drivers.
NB this is one way printer communication, so no printer issues will be reported back to the end user.
For my ERPNext setup, it is a local install, I don’t think this would apply to any cloud based installations for various reasons.
For this example I’ll use the Batch DocType, to generate a label which takes information from the Batch information listed.
Prerequisites
A label printer that can accept Zebra ZPL II language
The IP address of the label printer
Label Code
You can generate the code through online sites such as ZPL Labelary, other labeling programs such as BarTender, or you can get ZebraDesigner 3 for free directly from the Zebra.
To get the code you usually have to export to file, to get a file ending in the .prn extension.
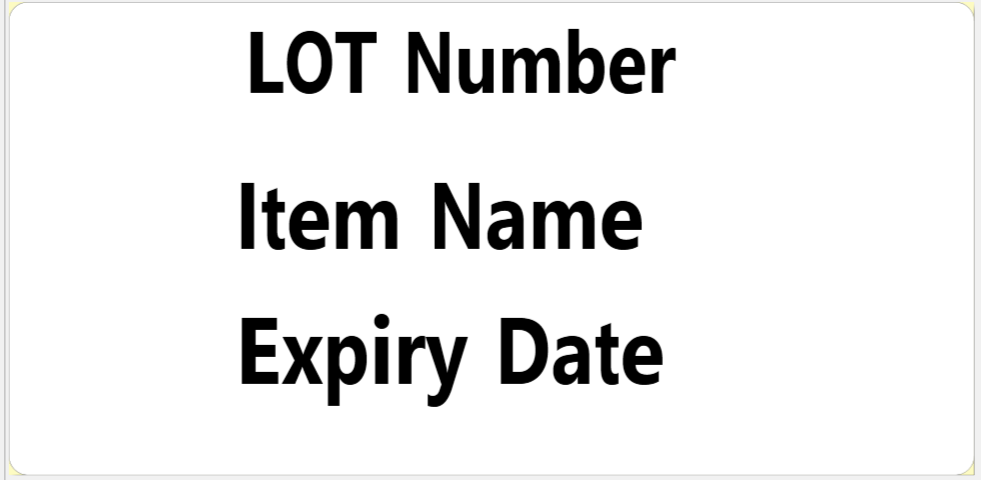
Open the .prn file with a text editor, and select all the code between ^XA and ^XZ, this is the actual label code. Here is some example code and the label it generates.
^XA
^MMT
^PW602
^LL0295
^LS0
^FT147,62^A0N,54,52^FH\^FDLOT Number^FS
^FT141,160^A0N,58,57^FH\^FDItem Name^FS
^FT141,244^A0N,58,57^FH\^FDExpiry Date^FS
^PQ1,0,1,Y^XZ
NB: the backslash \ is an escape character in javascript, so you need to add and extra \ where it appears in the code.
We are going to add three variables to the label code, for LOT number (lotn), Item Name(itempn), and Expiry Date(expi), so the label prints the Batch information.
We are also going to add a variable (values.label_n) to the PQ part of the label code.
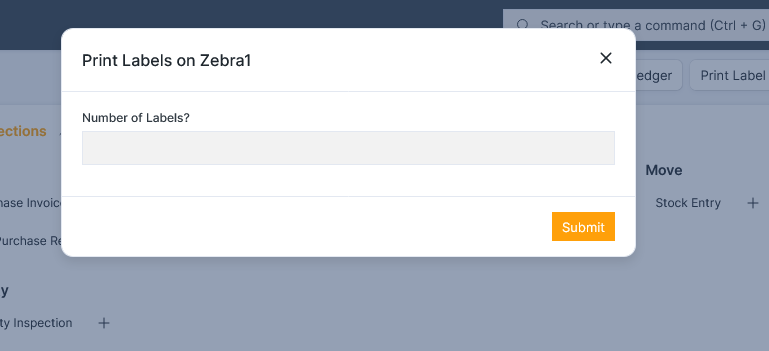
The PQ function in a ZPL label defines how many labels you want to print, this will be set by the end user when the modal appears.
This generates the following code, with the additional \ and the variables in place of the label text. The whole label code is wrapped in ", and where a variable needs to be added “+variable+” is inserted.
"^XA
^MMT
^PW602
^LL0295
^LS0
^FT147,62^A0N,54,52^FH\\^FD"+lotn+"^FS
^FT141,160^A0N,58,57^FH\\^FD"+itempn+"^FS
^FT141,244^A0N,58,57^FH\\^FD"+expi+"^FS
^PQ"+values.label_n+",0,1,Y^XZ"
The code now needs to be reduced to a single line to generate the following
"^XA^MMT^PW602^LL0295^LS0^FT147,62^A0N,54,52^FH\\^FD"+lotn+"^FS^FT141,160^A0N,58,57^FH\\^FD"+itempn+"^FS^FT141,244^A0N,58,57^FH\\^FD"+expi+"^FS^PQ"+values.label_n+",0,1,Y^XZ"
Create a new Client Script
In this example, DocType = Batch, Module (for export) = Custom, check Enabled, Apply To = Form
In the script window, post the following code, assuming 192.168.30.2 is the IP address of your label printer.
frappe.ui.form.on('Batch',  "refresh", function(frm) {
    frm.add_custom_button(__("Print Label"), function(){
        // When this button is clicked, do this
{
let d = new frappe.ui.Dialog({
    title: 'Print Labels on Zebra1',
    fields: [
        {
            label: 'Number of Labels?',
            fieldname: 'label_n',
            fieldtype: 'Int'
        }
    ],
    primary_action_label: 'Submit',
    primary_action(values) {
	var lotn = frm.doc.batch_id
    var expi = frm.doc.expiry_date
    var statu = frm.doc.goods_status;
	var itempn = frm.doc.item;
    var zpl = ;
    var ip_addr = "192.168.30.2";
    var url = "http://"+ip_addr+"/pstprnt";
    var method = "POST";
    var async = true;
    var request = new XMLHttpRequest();

      request.open(method, url, async);
      request.setRequestHeader("Content-Length", zpl.length);

      // Actually sends the request to the server.
      request.send(zpl);
      d.hide();
    }
});

d.show();


}

	});

});
For other DocTypes, find the field name and add frm.doc as a prefix to get the information you require.
The modal field name is label_n, and we need to add values. infornt of this to be able to access the value typed in to the modal.
Next paste in the previously saved label code at var zpl = ; between the equal sign and semicolon.
Save, and refresh your browser.
Go to the Batch list and select a record, you should see the new button Print Label at the top.

When pressed it should generate a modal, as below, enter the number of labels and press submit.
You should now be able to print labels directly from any browser connected to your local instance of ERPNext!
Hope this helps.
Cheers,
Paul