ERPNext-14 Production Setup
In this Setup we assume that you have the Custom App and you are using mariadb and OS is Ubuntu 18+.
ERP Discuss
Step 1:
Load the Custom App and other apps are hrms & payments module.
assume my custom app is custom_erpnext
Clone the frappe_docker. Open your Terminal.
Run Command
git clone https://github.com/frappe/frappe_docker
assume you’re using this domain ziptor.com. Note: It’s only for testing purposes don’t use this use your correct domain
Change the frappe_docker folder name to ziptor. Note: this step is only for understanding it’s not necessary
Run Command
sudo mv frappe_docker ziptor

cd ziptor
Load the custom App
Run Command
export APPS_JSON='[

{

"url": "https://github.com/frappe/erpnext",

"branch": "v14.24.1"

},

{

"url": "https://github.com/frappe/hrms",

"branch": "version-14"

},

{

"url": "https://github.com/frappe/payments",

"branch": "version-14"

},

{

"url": "https://access_token@github.com/my-github/custom_app",

"branch": "main"

}

]'
Note: change your custom app repo link and access_token and respective branch
Run Command
export APPS_JSON_BASE64=$(echo ${APPS_JSON} | base64 -w 0)
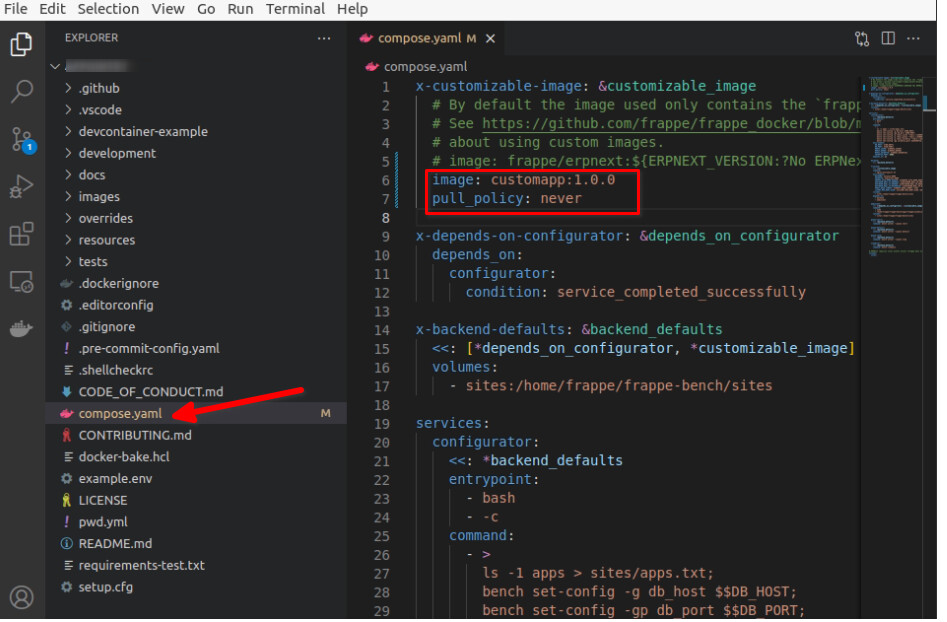
After taking your custom image change the compose.yaml file
x-customizable-image: &customizable_image

image: customapp:1.0.0

pull_policy: never
Run Command
docker build \

--build-arg=FRAPPE_PATH=https://github.com/frappe/frappe \

--build-arg=FRAPPE_BRANCH=v14.24.1 \

--build-arg=PYTHON_VERSION=3.10.5 \

--build-arg=NODE_VERSION=16.16.0 \

--build-arg=APPS_JSON_BASE64=$APPS_JSON_BASE64 \

--tag=customapp:1.0.0 \

--file=images/custom/Containerfile .
Note: custom_app_14:1.0.0 is your custom image
![]() Note
Note![]() : after taking the build if you want to update the code add
: after taking the build if you want to update the code add --no-cache in the command. like this.
docker build --no-cache \

--build-arg=FRAPPE_PATH=https://github.com/frappe/frappe \

--build-arg=FRAPPE_BRANCH=v14.24.1 \

--build-arg=PYTHON_VERSION=3.10.5 \

--build-arg=NODE_VERSION=16.16.0 \

--build-arg=APPS_JSON_BASE64=$APPS_JSON_BASE64 \

--tag=customapp:1.0.0 \

--file=images/custom/Containerfile .
Step 2:
Create configuration and resources directory
Run Command
mkdir ~/gitops
Step 3:
Basic Traefik setup using docker compose. Create a file called traefik.env in ~/gitops
Run Command
echo 'TRAEFIK_DOMAIN=ziptor.com' > ~/gitops/traefik.env

echo 'EMAIL=admin@ziptor.com' >> ~/gitops/traefik.env

echo 'HASHED_PASSWORD='$(openssl passwd -apr1 changeit | sed 's/\$/\\\$/g') >> ~/gitops/traefik.env
Deploy the traefik container with letsencrypt SSL
Run Command
docker compose --project-name traefik \

--env-file ~/gitops/traefik.env \

-f overrides/compose.traefik.yaml \

-f overrides/compose.traefik-ssl.yaml up -d
Step 4
Install MariaDB
Basic MariaDB setup using docker compose. Create a file called mariadb.env in ~/gitops
Run Command
echo "DB_PASSWORD=changeit" > ~/gitops/mariadb.env
Note:
Change the password from changeit to more secure. env file generated at location ~/gitops/mariadb.env will look like following:
Deploy the mariadb container
docker compose --project-name mariadb --env-file ~/gitops/mariadb.env -f overrides/compose.mariadb-shared.yaml up -d
Step 5
Install ERPNext
Create First Bench
Create first bench called erpnext-one with ziptor.com.
Create a file called erpnext-one.env in ~/gitops
Run Command
cp example.env ~/gitops/erpnext-one.env

sed -i 's/DB_PASSWORD=123/DB_PASSWORD=changeit/g' ~/gitops/erpnext-one.env

sed -i 's/DB_HOST=/DB_HOST=mariadb-database/g' ~/gitops/erpnext-one.env

sed -i 's/DB_PORT=/DB_PORT=3306/g' ~/gitops/erpnext-one.env

sed -i 's/SITES=`erp.example.com`/SITES=\`ziptor.com\`/g' ~/gitops/erpnext-one.env

echo 'ROUTER=erpnext-one' >> ~/gitops/erpnext-one.env

echo "BENCH_NETWORK=erpnext-one" >> ~/gitops/erpnext-one.env
Create erpnext-one.yaml
Run Command
docker compose --project-name erpnext-one \

--env-file ~/gitops/erpnext-one.env \

-f compose.yaml \

-f overrides/compose.redis.yaml \

-f overrides/compose.multi-bench.yaml \

-f overrides/compose.multi-bench-ssl.yaml config > ~/gitops/erpnext-one.yaml
Deploy erpnext-one containers:
Run Command
docker compose --project-name erpnext-one -f ~/gitops/erpnext-one.yaml up -d
Create sites ziptor.com:
docker compose --project-name erpnext-one exec backend \

bench new-site ziptor.com --no-mariadb-socket --mariadb-root-password changeit --install-app erpnext --admin-password changeit
Note: change the correct DB and Admin password changeit to some secure one
----------------------------------------🔥SET UP DONE🔥--------------------------------------------
But here you have to notice something. the sechedular is disabled

List of containers using custom image i mean customapp
erpnext-one-frontend-1

erpnext-one-backend-1

erpnext-one-queue-short-1

erpnext-one-scheduler-1

erpnext-one-websocket-1

erpnext-one-queue-long-1

erpnext-one-queue-default-1
Use this command to check in all these containers your custom app installed.
docker exec -it <CONTAINER_NAME> bash
example
docker exec -it erpnext-one-frontend-1 bash
Enable Schedular
bench --site ziptor.com enable-scheduler